FocusLynx WiFi Setup
Note
Only the FocusLynx controller supports onboard (Device) WiFi. The onboard WiFi is an optional addon card.
The FocusLynx with WiFi card can be controlled over a wireless network or directly. The FocusLynx will need to be configured with the network settings before it can connect to the network. This can be done via the onboard webpages, the ASCOM driver, or the Alpaca driver. You can see the Optec WiFi board installation guide (available from the website and included with the WiFi boards) for more details.
Note
It is generally recommended that the WiFi configuration be done over Serial or Ethernet. That way if a configuration is incorrect it is much easier to recover.
ASCOM
Open up FocusLynx Setup
Connect to the FocusLynx Hub
Click WiFi Setup
The WiFi Setup form should appear
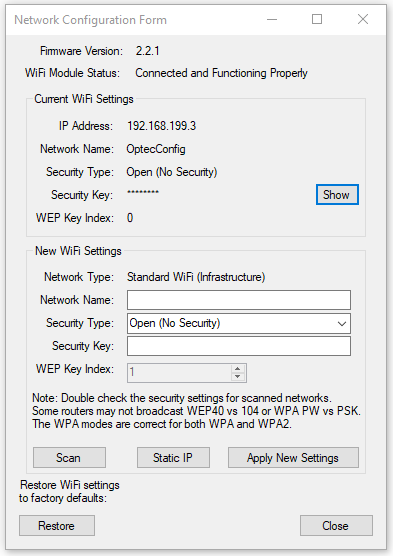
The WiFi Module Status and the Current WiFi Settings show the current configuration of the WiFi board
If the Network Name is OptecConfig then the board is in Soft AP mode, it is creating it’s own network
To scan for available networks click the scan button. This will only work for 2.4 gigahertz networks. If your network does not appear after a few scans try rebooting the hub.
Once you have selected the correct network you will need to enter the password and then apply the new settings
After ~30 seconds you can reconnect to the hub and verify that the module has connected to your network. Typically you can use the IP Address to discover this.
Once you are connected you can use the Static IP button in WiFi setup to configure a static IP if desired.
Alpaca
Open up Alpaca Setup
Connect to the FocusLynx Hub
Click WiFi Config
The WiFi Config window should open
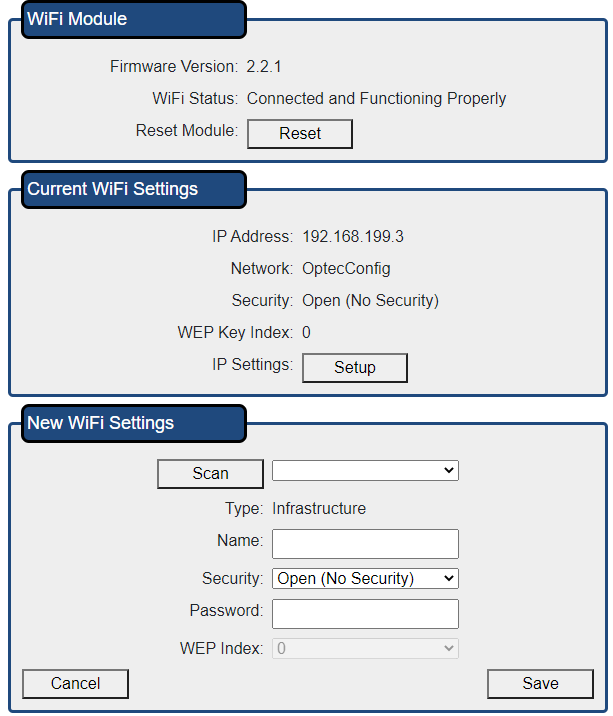
The WiFi Module Status and the Current WiFi Settings show the current configuration of the WiFi board
If the Network Name is OptecConfig then the board is in Soft AP mode, it is creating it’s own network
To scan for available networks click the scan button. This will only work for 2.4 gigahertz networks. If your network does not appear after a few scans try rebooting the hub.
Once you have selected the correct network you will need to enter the password and then apply the new settings
After ~30 seconds you can reconnect to the hub and verify that the module has connected to your network. Typically you can use the IP Address to discover this.
Once you are connected you can use the Static IP button in WiFi setup to configure a static IP if desired.
Direct Connection
The Optec WiFi Gen 2 boards supports direct connection when in Soft AP mode. This is the default mode of the board.
Scan for available WiFi networks on you device
Select and Connect to OptecConfig
Open a web browser and navigate to http://192.168.199.3
You should see a control page for your FocusLynx
Web Page
After opening the WiFi Webpage click the configure link
Click Scan for Wireless networks
Select your network and enter the password
You will see a “Reboot and Reconnection In Progress” message
After the reboot you can connect to the FocusLynx over the network.